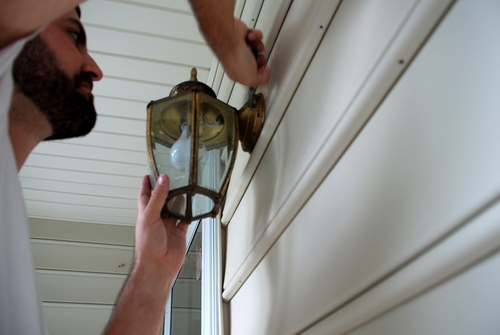
Our poor porch light has been abused by time. It’s so sad looking! But instead of rushing out and buying a new fixture, I armed myself with a bottle of Krylon Rust Protector. Here’s how I went about the light fixture rehab.

1. Turn off the power and remove the fixture
The fixture was attached to a mounting bracket with two screws. We used a putty knife to cut into the caulking around the edge.
2. Clean the fixture with super fine steel wool and liquid deglosser
The light was covered in grime and caulk, so I wiped it thoroughly with steel wool then cleaned it with a liquid deglosser. Pretty much the same process for spray painting our door knobs.
3. Prime
Because this is an outside fixture, I primed it for posterity. I let it dry for a couple of hours.
4. Paint with Krylon Rust Protector
Krylon Rust Protector is pretty great because it dries to touch in eight minutes. I used a brown hammered paint and was pleased at the resulting texture. This was my first time experimenting with the hammered finish spray paint. I was impressed. I gave the fixture two coats, following the directions on the can.

5. Wait, then rehang
I carefully moved the pieces inside to cure. The weather forecast wasn’t looking good. Thank goodness the paint dries to touch so quickly. But, since all the solvents hadn’t evaporated, we let the light hang out for a full day before piecing it back together.
Ryan remounted the light and I reapplied a fresh layer of clear caulk.
![]()
Not bad, huh? Sure, it takes a little more work than buying a new light fixture, but I much prefer using what I’ve got! And Krylon Rust Protector spray paint definitely helped.
It was so easy, I went ahead and did it to the back porch light!
Any spray paint action in your house? Transforming old pieces into something new with a layer of paint?
I was provided a can of Krylon Rust Protector free of charge, but all opinions are my own. Please do research before dealing with electrical in your home.